Bram Stoker's Dracula Walkthrought
The SNES Bram Stoker’s Dracula isn’t a sprint-through. It loves to stash essentials half a step from the obvious. We’ll thread rooms and courtyards carefully—keys, switches, safe spots—so you know what’s where. On the menu it’s Bram Stoker’s Dracula, but plenty of us just say “Dracula (Stoker).” Names don’t matter—what matters is the order of operations that gets you to the Count without chewing your nerves.
Castle: first halls and the dungeon
The opening hall draws your eye to the balconies, but don’t rush up. Sweep the ground floor right to left first: there’s a niche with handy loot under the central staircase, and a heavy left-hand curtain hides a lever that lifts the lock on the grate below. Don’t try to clear the fireplace pit at full tilt—there’s a tiny invisible lip at the edge. Step onto it and jump safely; that trick saves early chip damage.
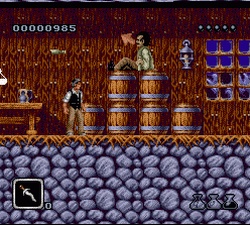
Past the grate is a corridor to the kitchen. The kitchen has two layers: floor and ceiling beams. Climb the shelf line with the jars, but don’t yank the first lever you see—it drops the grate over the oven and blocks a secret. First cross the beams to the right wall: you’ll hit a cracked brick; strike it to open a niche with a key to the side door. Now go back and pull the lever: it opens a floor hatch in the next room, sending you to the cellar.
The dungeon is a run of corridors with water and spikes. Planks crumble after the first step—land on the edge and hop immediately, no loitering. In the torch tunnels, eyeball the walls: if a torch hangs a touch lower than the rest, there’s usually a hidden pocket with a heal beneath it. At the end, the castle wants a second key. It’s neither on the boss nor in a chest—backtrack one screen. You’ll see a wooden platform on chains. Shoot or hit the right-hand chain—the platform drops, you climb to the upper gallery, and the key’s by a broken window.
The Act 1 boss is a feral beast in the courtyard. The arena’s uneven, with two ledges. Stand on the lower ledge, bait the jump, take a step back, then land three quick hits while it “slides” along the ground. Don’t try to outduel it midair—it’ll swat you into a pit. If you’ve got a ranged consumable, save it for phase two: it speeds up and starts jumping more. Yes, “hit the head” works—but only after it lands. For anyone searching “how to beat the wolf,” this loop is the safest.
Gallery, library, and towers
Next up: a stained-glass gallery. The doors love to fake you out—lots of short spurs without exits, but they hide required pickups. Stick to “go up first”: on the second tier there’s a room with bookcases. Push the books—one shelf slides, revealing a shaft with a ladder. Down below is a switch that unlocks the lift in the central hall. Without it, the elevator’s dead and you’ll lap the floor forever.
In the library, keep your momentum. Shelves jut out, but the outer ones crumble a second after you land—take diagonal jumps and don’t loiter. At the far right hangs a portrait you can use as a platform. Behind it is a tight corridor with a medkit and an extra life if you go to the end and hit the lighter-textured wall fragment. That’s the stage’s “hidden secret” people miss even when following old maps.
On the towers, wind platforms fling you off. Touch down in the center or the gust will peel you from the edge. Between towers are covered bridges; every other one has a bell. Hit it and the emblem door at the far end wakes up. Without the chime, that door won’t open no matter how much you lap the level. The tidy route: bell — bridge — door — short lift — upper roof.
London: streets and the graveyard
The city section in “Dracula (Stoker)” loves to troll you with windows. Don’t jump directly under sills—enemies spill from above on a script. Move so the window is behind and above you; that way the drop triggers after your jump. On rooftops, don’t smash every crate on sight: one row hides a lever that reconfigures the lamp posts. Without it, the path ahead is walled off by a fence of lamps—you literally can’t fit through.
The graveyard runs on two layers: upper, over the slabs, and lower, through the crypt. Up top, the gaps between headstones are constant. It’s easier to detour via the crypt: the entrance is the third mausoleum from the left (the door without a cross above the arch). Inside, the first fork splits up (dead end with a heal) and down (the correct route), with two lifts. On the second lift, be ready to drop mid-ride onto a midway ledge—that’s the “secret room” with the key for the cemetery gate. Miss it and you’ll be doubling back.
The graveyard boss is a vampire woman with burst dashes. She likes to spring to the far edge and immediately return with a low dive. The script is simple: stand about a body and a half from center, wait for the tiny pause before the dive, roll/step back, then string your hits. When she rises “to the ceiling,” don’t chase—hold your ground under her, as she drops almost straight. For anyone searching “how to clear the cemetery,” do not lose the crypt key; without it, the gates don’t arm and the fight won’t spawn.
Back to the castle: rooftops, gears, and the finale
The final stretch in Bram Stoker’s Dracula leans on machinery. The gear hall has three tiers with pendulums. Sync to the outer pendulum: jump right after you pass under it and the next one will be at its apex. On the middle tier there’s a lever that reverses the conveyor up top. Skip it and you’ll never reach the last door—the belt dumps you into spikes.
Before the roof, check your inventory: there’s a run of crumbly tiles ahead. They don’t break instantly—you’ve got half a second to bait the bats and swat them safely. On the roof there’s a shortcut: jump to the left turret, then onto the pipe’s ledge. There’s a breakable wall with a big medkit. It makes the “final fight” far kinder and saves attempts.
The final boss is the Count himself in beast form. The arena is narrow with two pits on the edges. Stick to the middle. His pattern: long run-up — jump — short burst. Don’t hit during the run-up; he has a clinch that shreds your health. Wait for the jump, micro-step under, then smack his head on landing. Every three cycles he “roars”—a free window for damage. If you’ve saved any ranged weapon, pop it right after the roar—the line is straight, hits are guaranteed. For anyone asking “how to beat Dracula,” this template is enough: three clean loops and discipline near the edges.
After the win, don’t forget the closing corridor—the game loves one last trick with a locked door right after the boss. Exit through the left arch, climb to the balcony, and there’s a tiny trigger on a platform. Stand on it for a second—don’t sprint past. Without that trigger, the cutscene won’t roll and you’ll think it bugged out. This SNES run is less about raw damage and more about knowing the quirks: when to pull, where to hop, and when to stand still for a beat.
If you’re not chasing 100%, aim for these anchors: the curtain switch at the very start, the kitchen key behind the cracked brick, the sliding bookcase in the gallery, the bell on the bridge, the crypt in the third mausoleum, the conveyor reversal in the gear hall, the medkit behind the rooftop pipe. With that checklist, Bram Stoker’s Dracula goes down clean, without empty laps. From there it’s muscle memory and routing: castle secrets, SNES bosses, and your perfect hit rhythm all lining up for one crisp final chord.